Playing with Kubernetes - Part 1


Kubernetes is an open source platform that automates container operations. originally developed and designed by engineers at Google. Considering the adoption rate among cloud providers and companies, we can clearly see that k8s has won the container orchestration. That means if you are working with distributed systems you are going to interact with this technology.
Even though you can play around with kubernetes in your local system using minikube, it will not do justice to the power of k8s since you are building a cluster with single node. Recently digitalocean announced that they are releasing managed kubernetes on the platform. And luckily they had given me a 100$ credit for 60 days to try out products from DO. So I have decided to build a sample real world application using kubernetes to learn more about k8s.
We are going build currency convertor app. It will have a front-end, a backend. We will deploy it in a multi node cluster with load balancing.
Here are the we are planning to build.
- A customer facing "front-end" application.
- A "backend" application which front-end talks to
- Public load balancer so that users can access the front-end
- Different deployments strategies
Before we talk about container orchestration, lets have a look at container. Containers offer a logical packaging mechanism in which applications can be abstracted from the environment in which they actually run. Similar to the physical containers, once you containerise your application, you can run it without worrying about the host. Even though there are many technologies for containerisation(lxc, rkt), we are going to use Docker since it is the most popular container technology.
Lets say you are building a nodejs application, if you don't have container technology then you need to procure a machine, install desired operation system (with correct version), set up nodejs run time, configure all the environment. And if you plan to have a second instance of the same application you need to repeat the procedure and make sure that everything same. But if you have packaged your application using any of the container technology, you can run it without worrying about where its going run.
Backend
we will build a simple REST API backend for our currency-convertor app. For brevity we will use a in-memory map to store the existing rates and expose a REST API to get the conversion rate for a currency. I am choosing go for this as go compiles to machine code and we don't have to install any runtime to run the application inside docker image. We can choose alpine linux as the base image as it is just 3.98 MB in size. Here is our backend code.
import (
	"encoding/json"
	"log"
	"net/http"
	"os"
)

type CurrencyResponse struct {
	Rate float64
	Host string
}

var currencyMap = map[string]float64{
	"usd": 1,
	"cad": 1.12,
	"inr": 72.3,
}

func handler(w http.ResponseWriter, r *http.Request) {
	currency := r.FormValue("currency")
	value := currencyMap[currency]
	if value != 0 {
		resp := CurrencyResponse{
			Rate: value,
			Host: os.Getenv("HOSTNAME"),
		}
		json.NewEncoder(w).Encode(resp)
	} else {
		w.WriteHeader(http.StatusBadRequest)
		w.Write([]byte("Not found"))
	}
}

func main() {
	http.HandleFunc("/", handler)
	log.Fatal(http.ListenAndServe(":8888", nil))
}
As you can see from the code, it starts a web-server on port 8888 and exposes single API. When it receives a request with a query parameter currency it return the value from map. If there is no value found in the map return Not found.
Before building the docker image lets build and verify the code
#build
go build -o docker-backend

#run
./docker-backend
You can verify the application by going to localhost:8888/?currency=usd from browser or using curl. And you should see response similar to below image.

Now that we have a running application, lets build a docker image out of it. For that we need DockerFile which contains all the instructions to create an image. As you can see its pretty simple and self-explanatory.
FROM golang:1.11-alpine AS build

WORKDIR /src/
COPY main.go go.* /src/
RUN CGO_ENABLED=0 go build -o /bin/demo

FROM scratch
COPY --from=build /bin/demo /bin/demo
ENTRYPOINT ["/bin/demo"]
Now we can build the image by executing
docker image build -t currency-app-backend .
then run the image using
docker container run -p 9999:8888 currency-app-backend
As you remember we are running our application in port 8888. But thats inside the container. While running the docker image we need to specify which port from host machine to be mapped to the internal port. In this command we are mapping port 9999 to containers 8888.
This can be verified by accessing localhost:9999/?currency=usd. We should get the same response as we got when we run the application directly.
Front end
Now we need to build a user friendly front-end where a user can easily access the currency conversion rates. We will build a simple nodejs application with express. For simplicity we will use simple buttons for each currency and on clicking them we will try to fetch conversion rate from the backend API. As you can see from the code we are using a parameter "BACKEND" to connect to the backend. But here we don't know what will be the IP address of backend service is going to be once its deployed in kubernetes. There are different ways to solve this issue and we will discuss some of them.
app.get('/currency', (req, resp) => {
  console.log('http://'+BACKEND+"/?currency="+req.query.currency+" API request send");
  request('http://'+BACKEND+"/?currency="+req.query.currency, { json: true }, (err, res, body) => {
  if (err) { return console.log(err); }
  resp.send(body);
});
Deploying to kubernetes cluster
Now that we are ready with our docker images for both front-end and backend, we need to deploy it to the cluster. We will use DigitalOcean managed kubernetes service. Creating a cluster is just few clicks. Select k8s version, data center region, number of nodes and and choose a name for your cluster and click create cluster button. Wait for couple of minutes as the cluster is getting created.
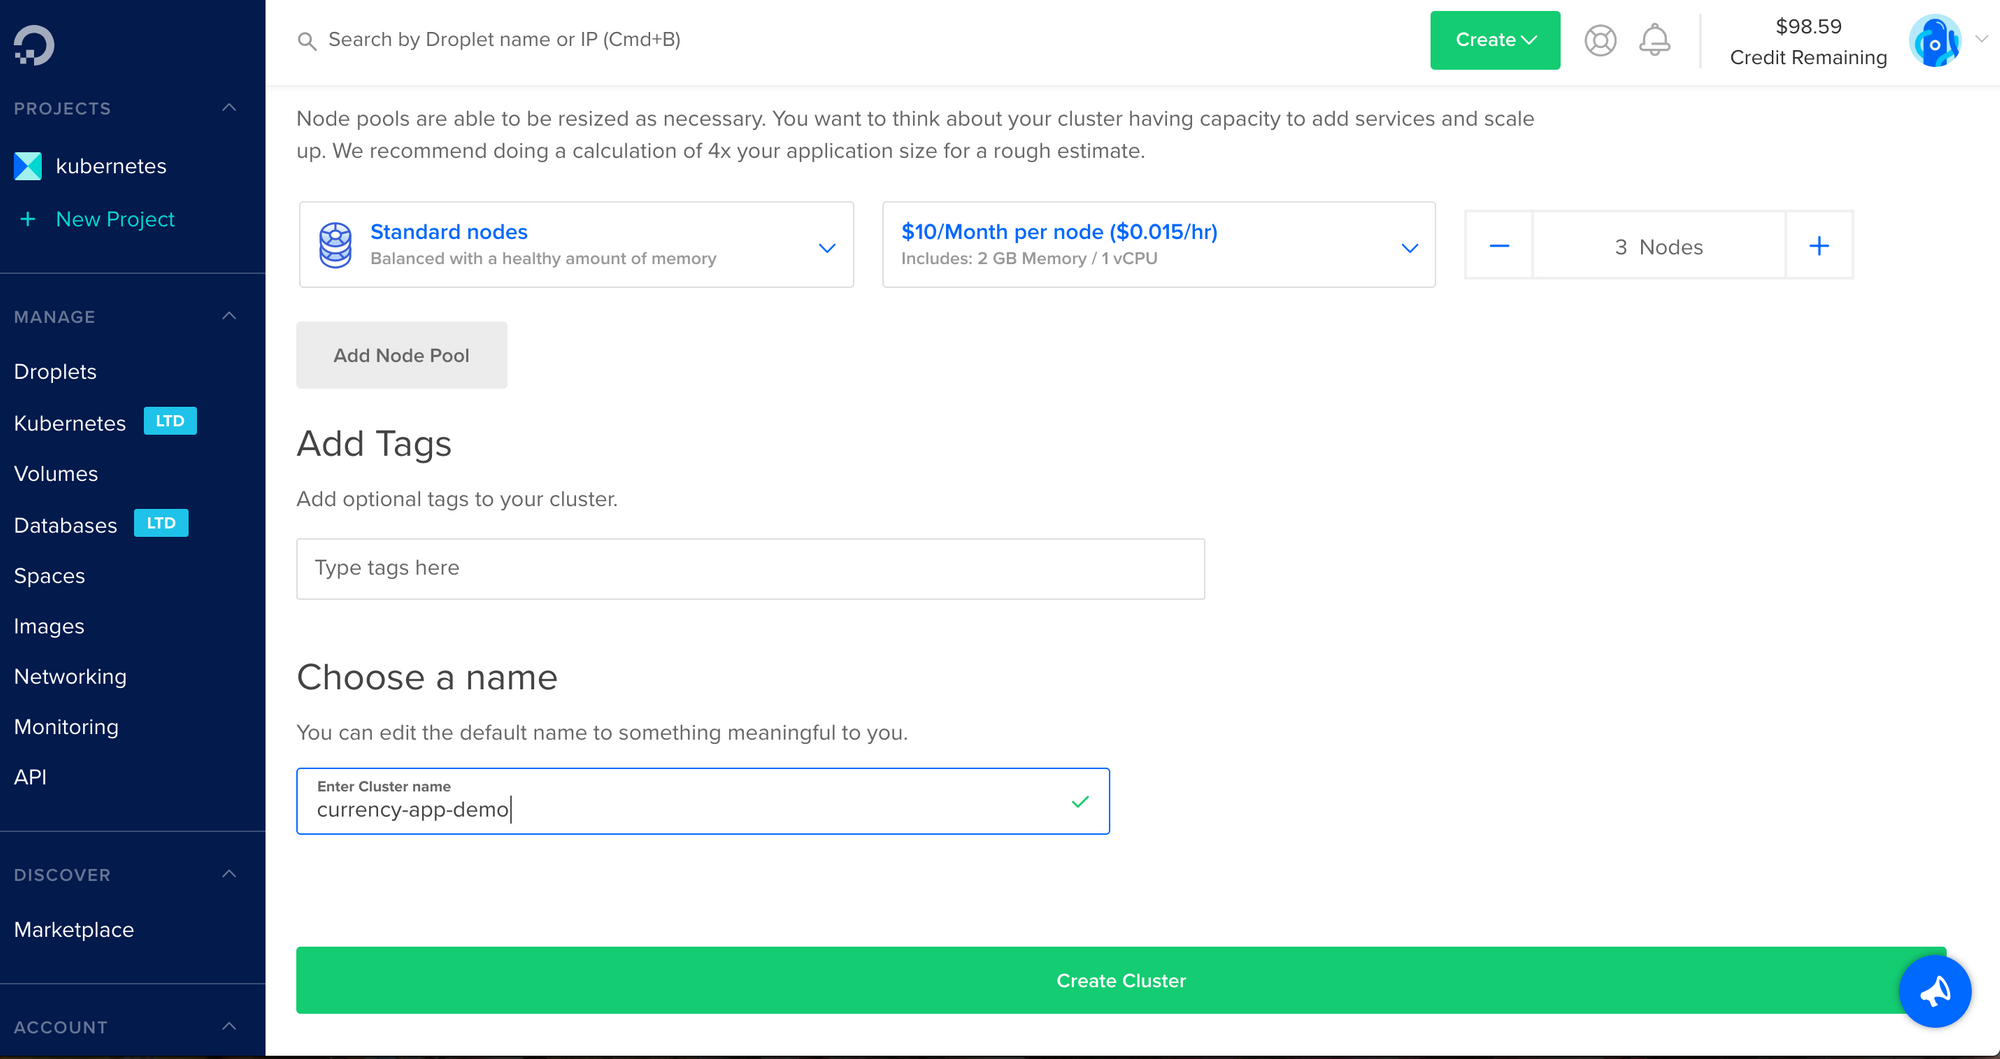
Once cluster is created successfully we need to connect the cluster. For that we need to install kubectl, the official Kubernetes command-line tool and The cluster configuration file, which contains authentication certificates. I have downloaded them and kept it in the same folder as "currency-app-demo-kubeconfig.yaml" Once you have both you can verify using
kubectl --kubeconfig=currency-app-demo-kubeconfig.yaml get nodesYou should see some thing similar to following image. You can see there are three node all are in ready state.

Deploying our service
Now we have our 3 node kubernetes cluster ready and our application is dockerised. Before we deploy our application we need to publish our image to a container registry. For now we will use Docker Hub. Before pushing the image we will tag it
docker tag currency-app-frontend vmuneeb/currency-app-frontend:1.0.0then push it to your account
docker push vmuneeb/currency-app-frontend:1.0.0
Now our image is now available to use from docker hub.
Kubernetes uses deployment controller for deploying applications. As per official documentation "A Deployment controller provides declarative updates for Pods and ReplicaSets.You describe a desired state in a Deployment object, and the Deployment controller changes the actual state to the desired state at a controlled rate. You can define Deployments to create new ReplicaSets, or to remove existing Deployments and adopt all their resources with new Deployments." We can use a simple yaml file to create a deployment.
apiVersion: apps/v1
kind: Deployment
metadata:
  name: currency-app-frontend-deployment
spec:
  replicas: 1
  selector:
    matchLabels:
      app: currency-app-frontend
  template:
    metadata:
      labels:
        app: currency-app-frontend
    spec:
      containers:
        - name: currency-app-frontend-image
          image: vmuneeb/currency-app-frontend:1.0.0
most of it are self explanatory. One thing we need to look is the selectors. This labels will be used extensively for selecting services later. Labels can be used to organize and to select subsets of objects in k8s. We can apply this yaml file using
kubectl --kubeconfig=currency-app-demo-kubeconfig.yaml apply -f docker-frontend/yaml/deployment.yaml If everything is success, you will see a success message on the terminal.
You can verify this buy checking the available pods
kubectl --kubeconfig=currency-app-demo-kubeconfig.yaml get pods
You can see we have one(as we have given only 1 as the number of replicas in our deployment.yaml) running pod.
Now our application is running successfully in the cluster. But we can't access it from outside world. There are many methods to expose applications like NodePort, ClusterIP, LoadBalancer. In this tutorial we will try to create a LoadBalancer to expose the service.
To expose the application to outside world we can create a load balancer. For that we will use a service controller. Here is the sample service.yaml.
apiVersion: v1
kind: Service
metadata:
  name: currency-app-frontend-service
spec:
  type: LoadBalancer
  ports:
  - port: 80
    targetPort: 8080
  selector:
    app: currency-app-frontend
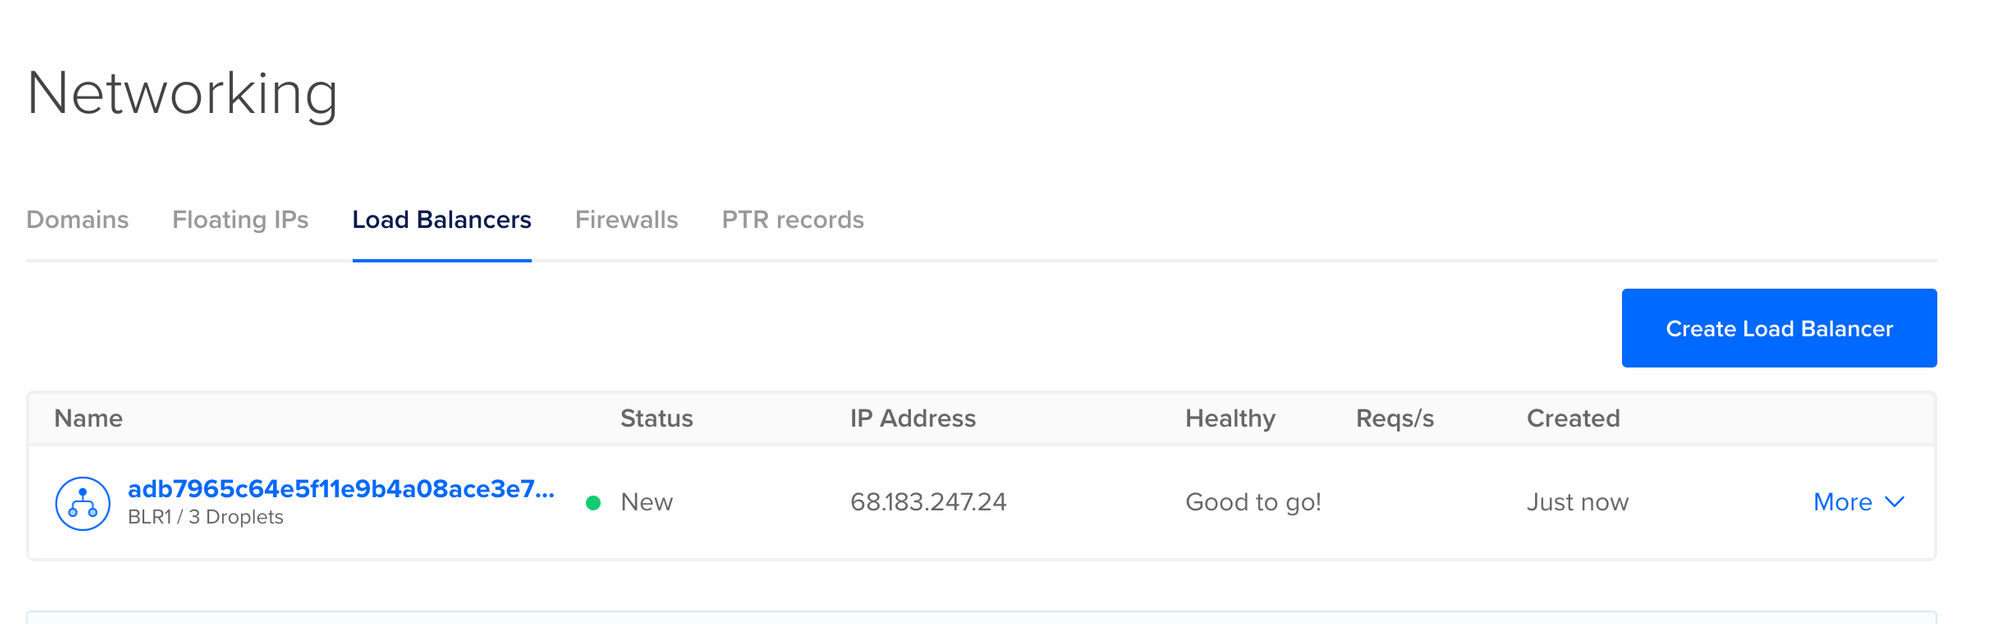
As you can see, we are creating a load balancer which listens on port 80 and redirect traffic to port 8080 of all the pods which has label as app=currency-app-frontend. Apply the yaml file.
kubectl --kubeconfig=currency-app-demo-kubeconfig.yaml apply -f docker-frontend/yaml/service.yamlIf you go to network tab and check loadbalancer section, you can see there is a load balancer created. If this was executed on AWS of google cloud, they will create a similar load balancer service for you.
Once it is successfully created you can check by accessing the IP address from any browser. You should see the simple HTML page we created for front-end application rendered.

Yay!!! So we have our first application deployed in kubernetes cluster and exposed using a load balancer. We will discuss about service discovery, deployment strategies and other topics in another post.